Secure Spring Boot REST API using Keycloak
In this tutorial, you will learn how to enhance the security of your Spring Boot REST APIs by implementing robust authentication and access control with Keycloak. We'll guide you through the process of setting up Keycloak to safeguard your APIs, ensuring that your data remains protected from unauthorized access. Dive into the world of secure development as we show you the steps to configure and implement Keycloak, allowing you to fortify your Spring Boot applications effortlessly.
To demonstrate this, we will create a simple Spring Boot application and integrate it with Keycloak to secure the REST APIs from unauthorized access. Furthermore, we will also show you how to programmatically create users, sign them in, and retrieve access tokens (enabling authenticated users to access the protected REST APIs using this token).
Follow these steps to complete this tutorial:
Set Up Keycloak
The first step is to download, set up, and run the Keycloak Server. If you have already set up the Keycloak server, proceed to step two. Otherwise, refer to our Keycloak quickstart tutorial to set up the Keycloak Server for use with this example.
Create a Spring Boot Application
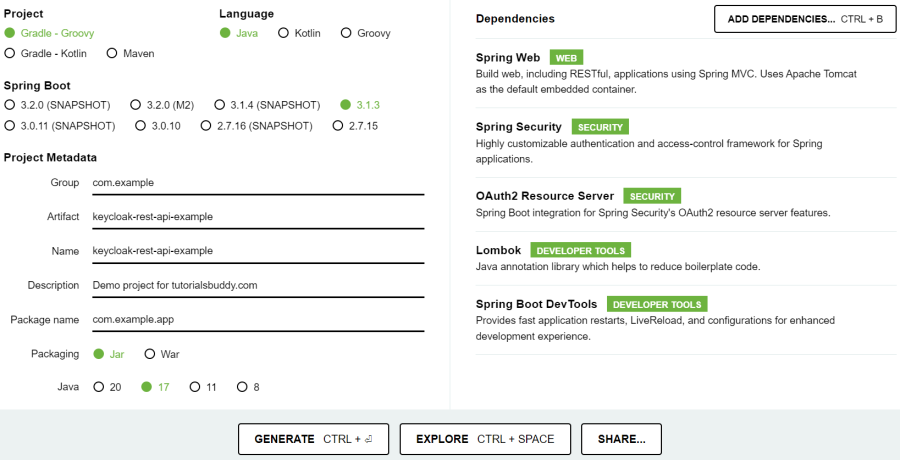
- Go to the Spring Initializr website at https://start.spring.io.
- Create a Spring Boot application with details as follows:
- Project: Choose the project type (Maven or Gradle).
- Language: Set the language to Java.
- Spring Boot: Specify the Spring Boot version. The default selection is the latest stable version of Spring Boot, so you can leave it unchanged.
- Project Metadata: Enter a Group and Artifact name for your project. The group name is the id of the project. Artifact is the name of your project. Add any necessary project metadata (description, package name, etc.)
- Choose between packaging as a JAR (Java Archive) or a WAR (Web Application Archive) depends on how you plan to deploy your Spring Boot application. Choose JAR packaging if you want a standalone executable JAR file and WAR packaging if you intend to deploy your application to a Java EE application server or servlet container. When you package your Spring Boot application as a JAR using JAR packaging, it includes an embedded web server, such as Tomcat, by default. This means that you don't need to separately deploy your application to an external Tomcat server. Instead, you can run the JAR file directly, and the embedded Tomcat server will start and serve your application.
- Select the Java version based on the compatibility requirements of your project. Consider the specific needs of your project, any compatibility requirements, and the Java version supported by your target deployment environment when making these choices.
- Click on the Add Dependencies button.
- Choose the following dependencies: Spring Web, Spring Security, OAuth2 Resource Server, Lombok, and Spring Boot DevTools.
- Generate the project:
- Click on the Generate button.
- Spring Initializr will generate a zip file containing your Spring Boot project.
- Download and extract the generated project:
- Download the zip file generated by Spring Initializr.
- Extract the contents of the zip file to a directory on your local machine.
- Import the project into your IDE:
- Open your preferred IDE (IntelliJ IDEA, Eclipse, or Spring Tool Suite).
- Import the extracted project as a Maven or Gradle project, depending on the build system you chose in Spring Initializr.
Here's an example:
Add Keycloak Spring Dependencies
Include the Keycloak Spring Boot Starter and Keycloak Admin REST Client dependencies in your application. The Keycloak Spring Boot Starter takes advantage of Spring Boot's auto-configuration, while the Keycloak Admin REST Client provides functionalities that help in creating users programmatically in Keycloak.
<dependency>
    <groupId>org.keycloak</groupId>
    <artifactId>keycloak-spring-boot-starter</artifactId>
    <version>23.0.1</version>
</dependency>
<dependency>
    <groupId>org.keycloak</groupId>
    <artifactId>keycloak-admin-client</artifactId>
    <version>23.0.1</version>
</dependency>
implementation group: 'org.keycloak', name: 'keycloak-spring-boot-starter', version: '23.0.1'
implementation group: 'org.keycloak', name: 'keycloak-admin-client', version: '23.0.1'
You can find other versions of the Keycloak Spring Boot Starter in the Maven Repository. Similarly, for other versions of the Keycloak Admin REST Client, you can find them in the Maven Repository.
Add Application Configurations
To configure Keycloak for Spring Boot, additional settings are required and can be specified in the Spring Boot configuration properties file. In the application.properties file, add the following configuration properties, making sure to replace the values with those specific to your project:
server.port = 8081
keycloak.realm = my-app-realm
keycloak.auth-server-url = http://localhost:8080
keycloak.ssl-required = external
#keycloak.resource is the client ID
keycloak.resource = my-app-client
keycloak.use-resource-role-mappings = true
#The line below will prevent redirect to login page
keycloak.bearer-only = true
keycloak.authority-prefix = ROLE_
server.connection-timeout=6000

# Get client secret from the Keycloak admin console (in the credential tab)
keycloak.client-secret = GfGO05wQwqQrozNfQEmxjSE7vzv6p7Lw

# Replace my-app-realm with your Keycloak realm ID
spring.security.oauth2.resourceserver.jwt.jwk-set-uri=http://localhost:8080/realms/my-app-realm/protocol/openid-connect/certs
Here's an explanation of the above configurations:
server.port: This configuration line is used to specify the port number on which the server will listen for incoming requests. In this case, it sets the server port to 8081.
keycloak.realm: Specifies the realm in Keycloak that the application will use for authentication and authorization. The realm named "my-app-realm" will be used.
keycloak.auth-server-url: Specifies the URL of the Keycloak authentication server. The application will communicate with the Keycloak server located at http://localhost:8080.
keycloak.ssl-required: Defines the SSL requirement for communication with the Keycloak server. In this case, it requires external SSL, meaning SSL/TLS must be used when communicating with the Keycloak server.
keycloak.resource: Sets the client ID that represents the Spring Boot application within the Keycloak realm.
keycloak.use-resource-role-mappings: Indicates that the application will use resource-level role mappings for authorization. This means that the application will obtain roles from the Keycloak client configuration instead of user-level role mappings.
keycloak.bearer-only: Specifies that the Spring Boot application will act as a bearer-only application. It will only accept bearer tokens for authentication and will not perform a redirect to the login page.
keycloak.authority-prefix: This configuration is related to how roles or authorities are prefixed in Keycloak. Roles or authorities are commonly prefixed with "ROLE_".
server.connection-timeout: Sets the connection timeout for the server to 6000 milliseconds. This property determines how long the server will wait for a connection before timing out.
keycloak.client-secret: This configuration specifies the client secret used by your application to authenticate itself with Keycloak.
spring.security.oauth2.resourceserver.jwt.jwk-set-uri: This configuration specifies the JSON Web Key Set (JWK Set) URI used for JWT (JSON Web Token) validation by the Spring Security OAuth 2.0 resource server. In OAuth 2.0, JWTs are often used to represent user identity and access tokens. The JWK Set URI points to a location where the public keys for validating JWTs are stored. These keys are used to verify the authenticity and integrity of JWTs. In this case, it's specifying that the JWK Set URI is located at http://localhost:8080/realms/my-app-realm/protocol/openid-connect/certs. Replace "my-app-realm" with your Keycloak realm id. Your Spring application will retrieve the keys from this URL to validate JWTs issued by Keycloak.
If you open http://localhost:8080/realms/my-app-realm/protocol/openid-connect/certs in a browser (replace my-app-realm with your Keycloak realm id), you should see something like the following:
{
    "keys": [
        {
            "kid": "lZJYgdDg1kBeX4gb4sDnGIsIol7TV8xLwEuXLTCXPaU",
            "kty": "RSA",
            "alg": "RSA-OAEP",
            "use": "enc",
            "n": "j23IeNSWW5fUVRtPuEeRxzL7Lq7ccxw",
            "e": "AQAB",
            "x5c": [
                "MIICpzCCAY8CBgGJsYZq5jANBgkqhkiG9wZq/UCVkR2HPl7Nugug="
            ],
            "x5t": "luH6IEx7YClXNOEUvkGX-pxNlws",
            "x5t#S256": "Ah7K_-9eq9JISBgcId-7JbpZ9pJqDXPsJSIwv6xob0M"
        }
    ]
}
Configure Security
Create a Spring configuration class that sets up and configures security for your Spring Boot application. It enables web security and method-level security using Spring Security:
package com.example.app.auth.config;

import java.util.Collection;
import java.util.Collections;
import java.util.Map;
import java.util.Objects;
import java.util.stream.Collectors;
import org.springframework.beans.factory.annotation.Value;
import org.springframework.context.annotation.Bean;
import org.springframework.context.annotation.Configuration;
import org.springframework.core.convert.converter.Converter;
import org.springframework.security.config.annotation.method.configuration.EnableMethodSecurity;
import org.springframework.security.config.annotation.web.builders.HttpSecurity;
import org.springframework.security.config.annotation.web.configuration.EnableWebSecurity;
import org.springframework.security.config.http.SessionCreationPolicy;
import org.springframework.security.core.GrantedAuthority;
import org.springframework.security.core.authority.SimpleGrantedAuthority;
import org.springframework.security.oauth2.jwt.Jwt;
import org.springframework.security.oauth2.server.resource.authentication.JwtAuthenticationConverter;
import org.springframework.security.web.SecurityFilterChain;
import org.springframework.util.Assert;
import jakarta.servlet.http.HttpServletResponse;

@Configuration
@EnableWebSecurity
@EnableMethodSecurity(prePostEnabled = true)
public class SecurityConfig {

  @Value("keycloak.resource")
  private String clientId;

  @Value("keycloak.authority-prefix")
  private String authorityPrefix;

  @Bean
  public SecurityFilterChain filterChain(HttpSecurity http) throws Exception {
    http.cors(cors -> cors.disable()).csrf(csrf -> csrf.disable())
        .authorizeHttpRequests((authz) -> authz.requestMatchers("/users/signup", "/users/login")
            .permitAll().anyRequest().authenticated())
        .sessionManagement((sessionManagement) -> {
          sessionManagement.sessionCreationPolicy(SessionCreationPolicy.STATELESS);
        }).exceptionHandling(exceptionHandling -> exceptionHandling
            .authenticationEntryPoint((request, response, ex) -> {
              response.sendError(HttpServletResponse.SC_UNAUTHORIZED, ex.getMessage());
            }))
        .oauth2ResourceServer(oauth2 -> oauth2
            .jwt(jwt -> jwt.jwtAuthenticationConverter(new KeycloakJwtAuthenticationConverter())));

    return http.build();
  }

  class KeycloakJwtAuthenticationConverter extends JwtAuthenticationConverter {

    public KeycloakJwtAuthenticationConverter() {
      KeycloakJwtAuthoritiesConverter grantedAuthoritiesConverter =
          new KeycloakJwtAuthoritiesConverter();
      grantedAuthoritiesConverter.setAuthorityPrefix(authorityPrefix);

      setJwtGrantedAuthoritiesConverter(grantedAuthoritiesConverter);
      setPrincipalClaimName(clientId);
    }
  }

  class KeycloakJwtAuthoritiesConverter implements Converter<Jwt, Collection<GrantedAuthority>> {

    private String authorityPrefix = "";

    public KeycloakJwtAuthoritiesConverter() {}

    public KeycloakJwtAuthoritiesConverter setAuthorityPrefix(String authorityPrefix) {
      Assert.notNull(authorityPrefix, "authorityPrefix cannot be null");
      this.authorityPrefix = authorityPrefix;
      return this;
    }

    @Override
    public Collection<GrantedAuthority> convert(Jwt source) {
      Map<String, Object> realmAccess = source.getClaim("realm_access");
      if (Objects.isNull(realmAccess)) {
        return Collections.emptySet();
      }

      Object roles = realmAccess.get("roles");
      if (Objects.isNull(roles) || !Collection.class.isAssignableFrom(roles.getClass())) {
        return Collections.emptySet();
      }

      Collection<?> rolesCollection = (Collection<?>) roles;

      return rolesCollection.stream().filter(String.class::isInstance)
          .map(x -> new SimpleGrantedAuthority(authorityPrefix + x)).collect(Collectors.toSet());
    }
  }

}
Here, the code configures security settings for the Spring application. This filterChain(HttpSecurity http) method configures the security filter chain. It takes an HttpSecurity object as a parameter, which is provided by Spring Security for configuring security settings. The configuration disables CORS, CSRF protection, and sets up authorization.
This sessionCreationPolicy(SessionCreationPolicy.STATELESS) sets the session creation policy to STATELESS, meaning that your application will not create HTTP sessions. This is common for stateless REST APIs. Since REST APIs are stateless, they are generally less vulnerable to CSRF attacks. If a stateless API uses token-based authentication, such as JWT, CSRF protection is typically unnecessary and should be disabled as demonstrated in this tutorial. However, if a stateless API relies on session-based cookie authentication, enabling CSRF protection becomes essential. It allows all requests to the "/users/signup" and "/users/login" endpoints without authentication, but requires authentication for any other request. It configures OAuth 2.0 resource server with a custom JWT authentication converter. This is likely used to customize how JWT tokens are processed and authenticated.
This KeycloakJwtAuthenticationConverter class is a custom implementation that extends the JwtAuthenticationConverter class. The KeycloakJwtAuthenticationConverter is designed to customize the JWT-to-authentication conversion process specifically for Keycloak integration. It configures how authorities are extracted from the JWT token, specifies an authority prefix, and sets the name of the principal claim. This customization allows Spring Security to correctly authenticate users based on the information provided in the JWT tokens issued by Keycloak.
The KeycloakJwtAuthoritiesConverter is a custom class that implements the Converter<Jwt, Collection<GrantedAuthority>> interface. It is designed to work with JWT tokens typically issued by Keycloak. It extracts the roles from the JWT token and converts them into GrantedAuthority objects. This is commonly used in security and authentication systems to extract and convert user roles or permissions from a JWT token into authorities that can be used for access control.
Create Data Transfer Objects
Create a class named SignUpDto as a Data Transfer Object (DTO) to represent the request payload for signing up:
package com.example.app.user.dto;

import com.fasterxml.jackson.annotation.JsonInclude;
import com.fasterxml.jackson.annotation.JsonInclude.Include;
import lombok.AllArgsConstructor;
import lombok.Builder;
import lombok.Data;
import lombok.NoArgsConstructor;
import lombok.ToString;

@Data
@Builder
@AllArgsConstructor
@NoArgsConstructor
@JsonInclude(Include.NON_NULL)
@ToString
public class SignUpDto {

  private String email;
  private String firstname;
  private String lastname;
  private String password;
  private int statusCode;
  private String statusMessage;
}
Create a class named LoginRequestDto as a Data Transfer Object (DTO) to represent the request payload for user login details:
package com.example.app.user.dto;

import com.fasterxml.jackson.annotation.JsonInclude;
import com.fasterxml.jackson.annotation.JsonInclude.Include;
import lombok.AllArgsConstructor;
import lombok.Builder;
import lombok.Data;
import lombok.NoArgsConstructor;

@Data
@Builder
@AllArgsConstructor
@NoArgsConstructor
@JsonInclude(Include.NON_NULL)
public class LoginRequestDto {

  private String email;
  private String password;
}
Create a class named LoginResponseDto as a Data Transfer Object (DTO) to represent the response for user login:
package com.example.app.user.dto;

import com.fasterxml.jackson.annotation.JsonInclude;
import com.fasterxml.jackson.annotation.JsonInclude.Include;
import lombok.AllArgsConstructor;
import lombok.Builder;
import lombok.Data;
import lombok.NoArgsConstructor;

@Data
@Builder
@AllArgsConstructor
@NoArgsConstructor
@JsonInclude(Include.NON_NULL)
public final class LoginResponseDto {

  private String accesssToken;
  private String refreshToken;
  private String scope;
  private Long expiresIn;
  private String error;
}
Create Service
Create an interface named UserService:
package com.example.app.user.service;

import com.example.app.user.dto.LoginRequestDto;
import com.example.app.user.dto.LoginResponseDto;
import com.example.app.user.dto.SignUpDto;

public interface UserService {

  SignUpDto signUp(SignUpDto signUpDto);

  LoginResponseDto login(LoginRequestDto loginRequest);
}
Create Service Implementation Class
Create a service implementation class named UserServiceImpl for UserService interface:
package com.example.app.user.service.impl;

import java.util.Arrays;
import java.util.HashMap;
import java.util.Map;
import org.jboss.resteasy.client.jaxrs.internal.ResteasyClientBuilderImpl;
import org.keycloak.OAuth2Constants;
import org.keycloak.admin.client.CreatedResponseUtil;
import org.keycloak.admin.client.Keycloak;
import org.keycloak.admin.client.KeycloakBuilder;
import org.keycloak.admin.client.resource.RealmResource;
import org.keycloak.admin.client.resource.UserResource;
import org.keycloak.admin.client.resource.UsersResource;
import org.keycloak.authorization.client.AuthzClient;
import org.keycloak.authorization.client.Configuration;
import org.keycloak.representations.AccessTokenResponse;
import org.keycloak.representations.idm.CredentialRepresentation;
import org.keycloak.representations.idm.RoleRepresentation;
import org.keycloak.representations.idm.UserRepresentation;
import org.slf4j.Logger;
import org.slf4j.LoggerFactory;
import org.springframework.beans.factory.annotation.Value;
import org.springframework.stereotype.Service;
import com.example.app.user.dto.LoginRequestDto;
import com.example.app.user.dto.LoginResponseDto;
import com.example.app.user.dto.SignUpDto;
import com.example.app.user.service.UserService;
import jakarta.ws.rs.core.Response;

@Service
public class UserServiceImpl implements UserService {
  private static final Logger LOGGER = LoggerFactory.getLogger(UserServiceImpl.class);

  @Value("${keycloak.auth-server-url}")
  private String authServerUrl;

  @Value("${keycloak.realm}")
  private String realm;

  @Value("${keycloak.resource}")
  private String clientId;

  private String role = "student";


  @Value("${keycloak.client-secret}")
  private String clientSecret;

  @Override
  public SignUpDto signUp(SignUpDto signUpDto) {
    LOGGER.info("signUp... {}", signUpDto);
    Keycloak keycloak =
        KeycloakBuilder.builder().serverUrl(authServerUrl).grantType(OAuth2Constants.PASSWORD)
            .realm("master").clientId("admin-cli").username("admin").password("admin123$")
            .resteasyClient(new ResteasyClientBuilderImpl().connectionPoolSize(10).build()).build();

    keycloak.tokenManager().getAccessToken();

    UserRepresentation user = new UserRepresentation();
    user.setEnabled(true);
    user.setUsername(signUpDto.getEmail());
    user.setFirstName(signUpDto.getFirstname());
    user.setLastName(signUpDto.getLastname());
    user.setEmail(signUpDto.getEmail());

    // Get realm
    RealmResource realmResource = keycloak.realm(realm);
    UsersResource usersRessource = realmResource.users();

    Response response = usersRessource.create(user);

    signUpDto.setStatusCode(response.getStatus());
    signUpDto.setStatusMessage(response.getStatusInfo().toString());

    if (response.getStatus() == 201) {

      String userId = CreatedResponseUtil.getCreatedId(response);

      LOGGER.info("Created userId {}", userId);

      // create password credential
      CredentialRepresentation passwordCred = new CredentialRepresentation();
      passwordCred.setTemporary(false);
      passwordCred.setType(CredentialRepresentation.PASSWORD);
      passwordCred.setValue(signUpDto.getPassword());

      UserResource userResource = usersRessource.get(userId);

      // Set password credential
      userResource.resetPassword(passwordCred);

      // Get realm role student
      RoleRepresentation realmRoleUser = realmResource.roles().get(role).toRepresentation();

      // Assign realm role student to user
      userResource.roles().realmLevel().add(Arrays.asList(realmRoleUser));

    }
    return signUpDto;

  }

  @Override
  public LoginResponseDto login(LoginRequestDto loginRequest) {
    Map<String, Object> clientCredentials = new HashMap<>();
    clientCredentials.put("secret", clientSecret);
    clientCredentials.put("grant_type", "password");

    Configuration configuration =
        new Configuration(authServerUrl, realm, clientId, clientCredentials, null);
    AuthzClient authzClient = AuthzClient.create(configuration);

    AccessTokenResponse response =
        authzClient.obtainAccessToken(loginRequest.getEmail(), loginRequest.getPassword());
    LoginResponseDto loginResponse = new LoginResponseDto();
    loginResponse.setAccesssToken(response.getToken());
    loginResponse.setRefreshToken(response.getRefreshToken());
    loginResponse.setScope(response.getScope());
    loginResponse.setExpiresIn(response.getExpiresIn());
    loginResponse.setError(response.getError());
    return loginResponse;
  }

}
Create a Web Controller
Create a controller class named UserController that will handle HTTP requests and interact with the UserService:
package com.example.app.user.controller;

import java.util.Arrays;
import org.springframework.beans.factory.annotation.Autowired;
import org.springframework.http.MediaType;
import org.springframework.http.ResponseEntity;
import org.springframework.web.bind.annotation.GetMapping;
import org.springframework.web.bind.annotation.PostMapping;
import org.springframework.web.bind.annotation.RequestBody;
import org.springframework.web.bind.annotation.RequestMapping;
import org.springframework.web.bind.annotation.RestController;
import com.example.app.user.dto.LoginRequestDto;
import com.example.app.user.dto.LoginResponseDto;
import com.example.app.user.dto.SignUpDto;
import com.example.app.user.service.UserService;

@RestController
@RequestMapping(path = "/users")
public class UserController {
  @Autowired
  private UserService userService;

  @PostMapping(path = "/signup", consumes = {MediaType.APPLICATION_JSON_VALUE},
      produces = {MediaType.APPLICATION_JSON_VALUE})
  public ResponseEntity<SignUpDto> signUp(@RequestBody SignUpDto signUpRequest) {
    return ResponseEntity.ok(userService.signUp(signUpRequest));
  }

  @PostMapping(path = "/login", consumes = {MediaType.APPLICATION_JSON_VALUE})
  public ResponseEntity<LoginResponseDto> login(@RequestBody LoginRequestDto loginDto) {
    return ResponseEntity.ok(userService.login(loginDto));
  }

  @GetMapping(path = "/data")
  public ResponseEntity<?> data() {
    return ResponseEntity.ok(Arrays.asList("Hello world!"));
  }
}
Here, the UserController class defines endpoints for user signup, login, and data retrieval. It interacts with a UserService to perform user-related operations and returns responses in JSON format.
Run and Test your Application
Use your IDE's build tools (Maven or Gradle) to build your project and resolve dependencies. Once the build is successful, run the main class of your application. You should see logs indicating that the application has started.
Test your endpoints by using API testing tools such as Postman:
Before testing, make sure Keycloak Server is up and running.
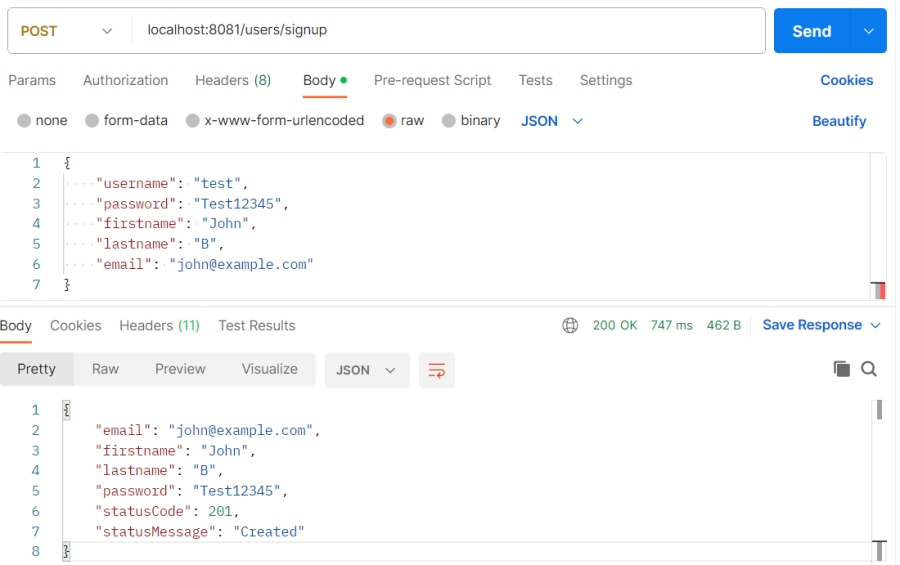
- User Sign Up API test example:
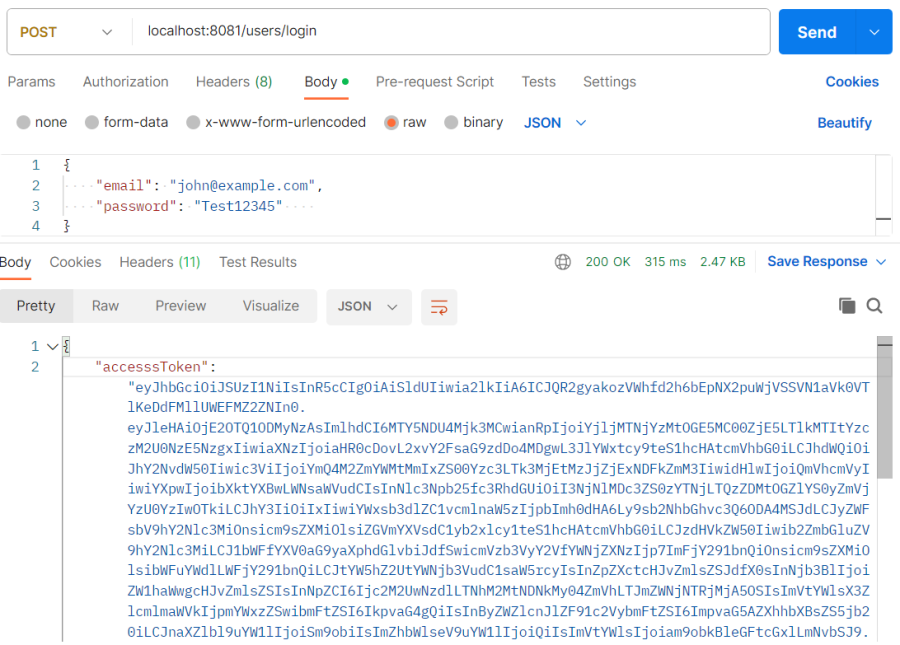
- User Login API test example:
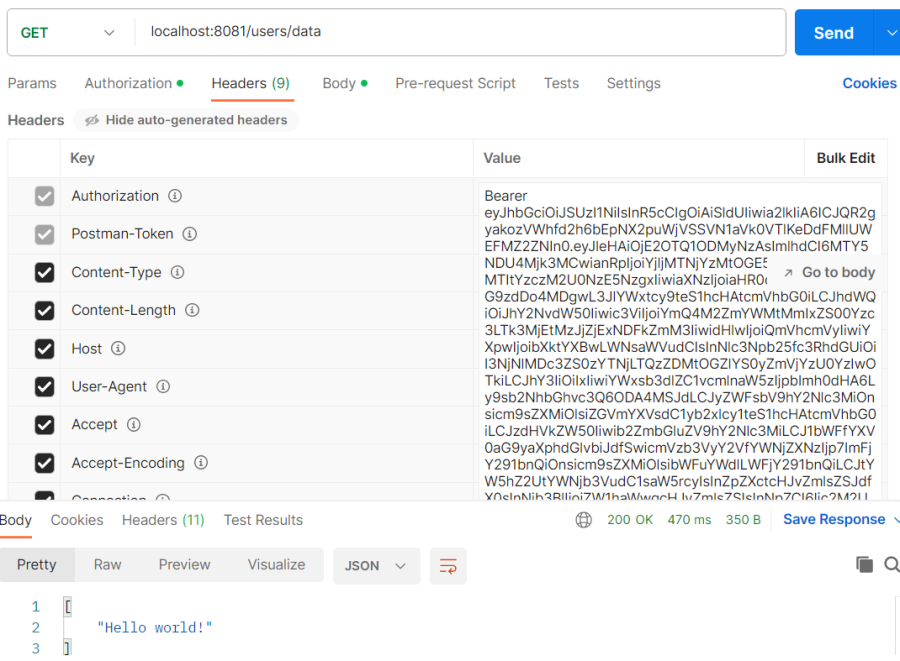
- Access the secured API using the access token received in the response after a successful login. For example: